
How to Enable or Disable Automatic Repair in Windows 11

Picture this. You press the power button and see the blue "Preparing Automatic Repair" screen. Dots spin. The PC restarts. Then the same screen comes back. Nothing is broken, but Windows won't let go.
Other times, the problem runs the opposite way. A malware cleanup tool quietly turns the feature off. You find out months later, when a real boot error hits and Windows doesn't even try to help.
Either way, the setting is easy to change. It takes one command and a restart.
What Automatic Repair Does in Windows 11
Automatic Repair is a rescue tool for startup failures. If Windows can't boot, the tool steps in and tries to patch the damage. You don't click anything.
Windows usually starts it after two failed boots in a row. The repair then runs at the next restart.
What Sets It Off
Most triggers are ordinary. A power cut in the middle of startup is a big one. A Windows update that stalls halfway is another. Damaged boot records, Secure Boot errors, BitLocker problems, bad drivers, and dying drives can all do it too.
How It Differs from Manual Repair
Manual repair happens inside the Windows Recovery Environment (WinRE). You have to open it yourself. Automatic Repair needs no invite. It fires early in startup, before you see the desktop.
What Happens During an Automatic Repair
A mechanic checks the easy things first. Windows follows a similar order.
Boot File Check
Windows starts with the boot manager, called bootmgr. Then it reads the Boot Configuration Data (BCD). The BCD holds the instructions for starting Windows. If it's damaged, the PC can't boot.
Disk Scan
Next comes a disk check, similar to chkdsk. It looks for file system errors that could block startup.
Recovery Partition
Windows keeps WinRE in a hidden partition. Because that area sits apart from the main system, repairs can run even when Windows itself is broken. The tool can restore boot files, rebuild the BCD, or roll back a bad change.
Handoff to You
If nothing works, Windows shows the Advanced options menu. You can pick System Restore, Safe Mode, or Reset this PC.
Why You Might Change This Setting
Home users should usually leave it on. IT staff have more reasons to touch it.
Reasons to Turn It Off
- The PC loops in repair, even though the drive is healthy.
- You want to read the real error instead of a repair screen.
- You are testing a machine for boot faults.
Reasons to Turn It On
- Malware or a cleanup tool switched it off.
- You want Windows to fix small boot errors alone.
- You support people who can't handle startup trouble.
Method 1: Use bcdedit in PowerShell
This is the route most technicians take. It's fast and exact, and it works in scripts. The command-line tool is bcdedit. It edits the BCD directly. You need admin rights, and Windows must boot normally. If it won't, jump to Method 3.
Step 1: Open PowerShell as Admin
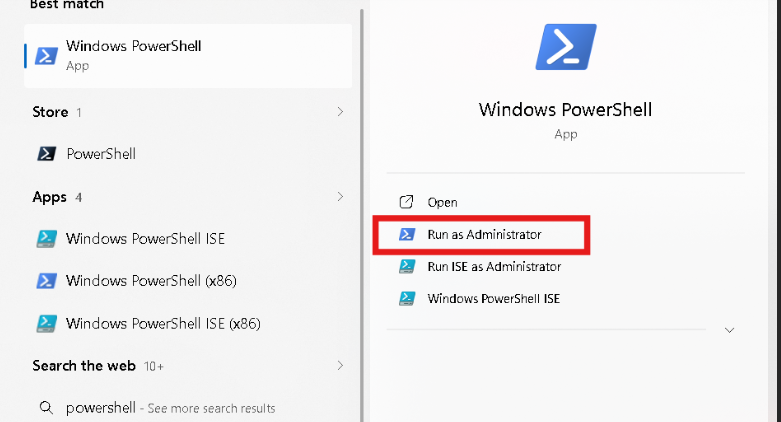
Click Start and type PowerShell. Right-click the top result and choose Run as administrator. Say Yes to the prompt.
Step 2: Check the Current Setting

Type this and press Enter: bcdedit /enum "{default}"
PowerShell wants quotes around the curly braces. Skip them and you will probably get an error.
Step 3: Read the recoveryenabled Line
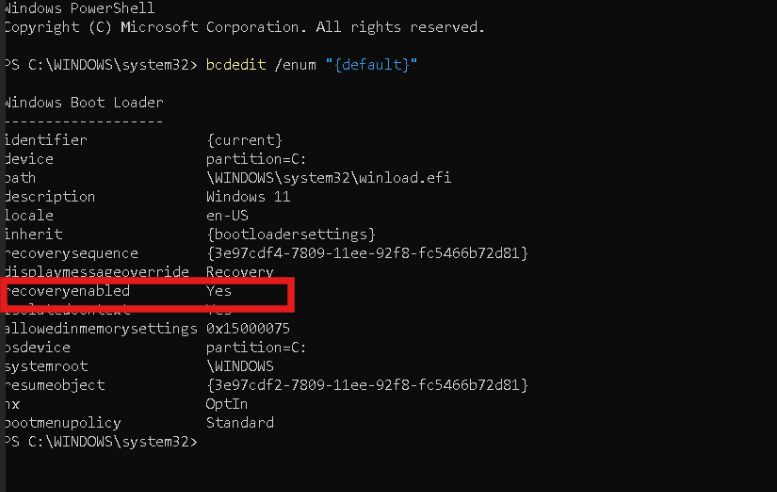
The output is long. Scroll until you see recoveryenabled. If it says Yes, Automatic Repair is on. If it says No, it's off.
Step 4: Change the Value
- To turn it off: bcdedit /set "{default}" recoveryenabled No
- To turn it on: bcdedit /set "{default}" recoveryenabled Yes
- You should see "The operation completed successfully."

Step 5: Restart and Verify
Reboot the PC. Then run the Step 2 command again. The value should match what you set.
Why Techs Like This Method
One line does the job. You can paste it into a script and send it to a whole fleet. Typos are also rare, since there are no menus to misclick.
Method 2: Can the Registry Do It?
A few older guides say yes. They're wrong.
The recoveryenabled value lives in the BCD store. That store is a separate file. It isn't part of the registry, so no registry edit can flip this switch.
Why Caution Still Matters
Some registry keys do shape startup. Session Manager is one example. But a wrong value there can stop Windows from booting, and it can even lock you out of WinRE. Registry edits also lack the safety checks that bcdedit has.
Keep them off production machines. If you're just curious, use a spare PC.
How to Back Up a Registry Key
Export a key before you change anything.
- Press Win + R, type regedit, and press Enter. Click Yes.

- Browse to HKEY_LOCAL_MACHINE\SYSTEM\CurrentControlSet\Control\Session Manager.
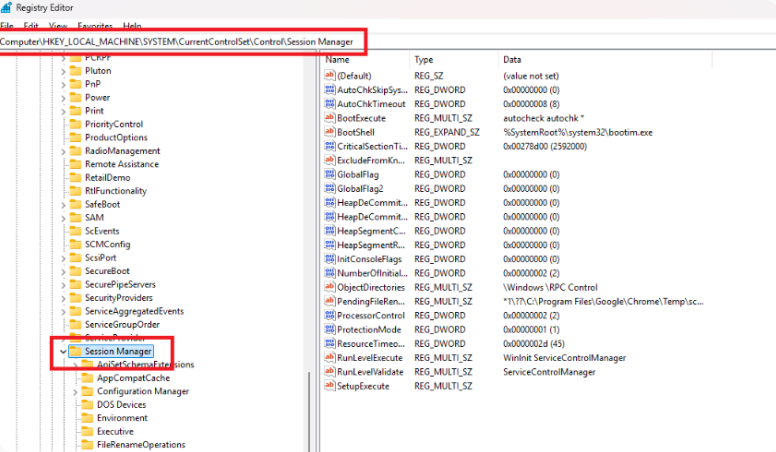
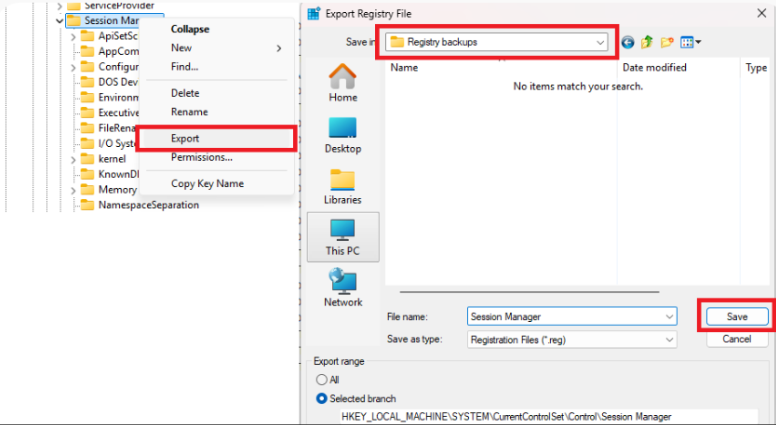
- Right-click Session Manager and pick Export. Save the .reg file somewhere safe.
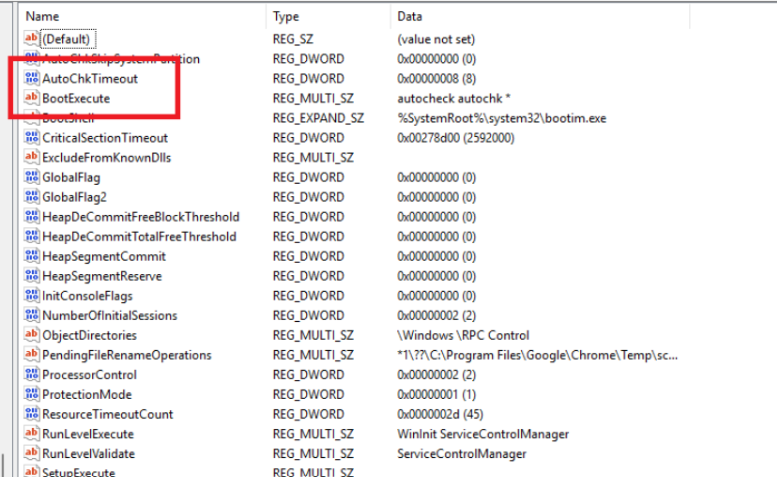
- Look at the right pane of the Session Manager key. You will see a list of values. Two of them shape startup. BootExecute sets which programs run early in boot. AutoChkTimeout sets how long Windows waits before a disk check.
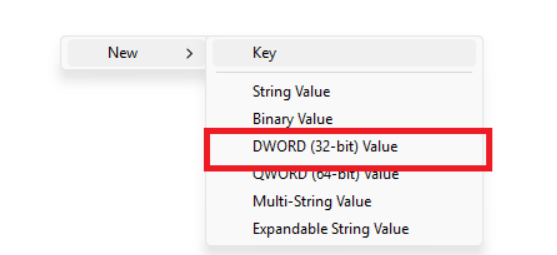
- Need a new value? Right-click any blank space in the right pane. Choose New, then DWORD (32-bit) Value.
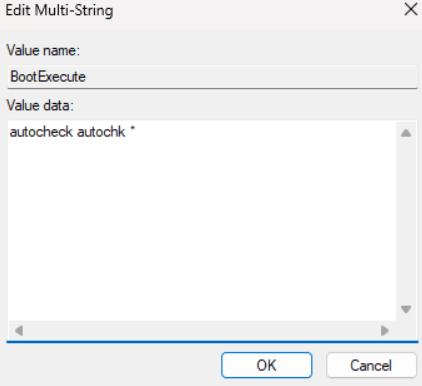
- To edit a value, double-click it. Change it slowly and with care. One wrong entry can stop Windows from booting.
- Restart the PC. Watch the startup closely. Make sure Windows boots as normal. If it doesn't, import your backup .reg file to undo the change.
Fixing Common Problems
Sometimes the command runs and nothing seems to change. Here are the usual reasons.
Confirm Your Change First
Run bcdedit /enum "{default}" again. Look at recoveryenabled. If it shows your new value, the change worked. Any remaining trouble comes from somewhere else.
The Command Says Success, but the Value Is the Same
This confuses a lot of people. Windows reports success, yet the old value stays.
Cause 1: Wrong Boot Entry
You may have edited {default} while your PC boots from {current}. Then your change hits an entry Windows never uses.
- Fix: Run bcdedit /enum all. Find the entry marked current. Use its ID in your command.
Cause 2: Security Software
Some antivirus products guard the BCD. They may block edits, even from an admin account.
- Fix: Pause the product briefly. Run your command. Turn protection back on right after.
The PC Loops After You Turn Repair Off
It happens. If a real fault exists and repair is off, Windows can't attempt a fix. It just fails again and again.
How to Break the Loop
- Open WinRE with the three-shutdown trick.
- Go to Troubleshoot > Advanced options > Command Prompt.
- Switch repair back on: bcdedit /set {default} recoveryenabled Yes
- Run these one at a time:
- bootrec /fixmbr
- bootrec /fixboot
- bootrec /rebuildbcd
- sfc /scannow /offbootdir=C:\ /offwindir=C:\Windows
- Restart and let Automatic Repair run.
On some UEFI machines, bootrec /fixboot returns "Access is denied." If you see that, skip it and run the next command.
Check That WinRE Is Enabled
Automatic Repair depends on WinRE. If WinRE is off, the repair has nothing to run on. Open PowerShell as admin and type:
- reagentc /info
Find the Windows RE status line. It should read Enabled. If it doesn't, run reagentc /enable.
Advice for IT Teams
When you look after dozens or hundreds of PCs, small habits pay off.
Keep It On by Default
Automatic Repair spares users a long outage. Turn it off for a specific task only. Switch it back on when the task ends.
Write Down Every Change
Record the device, the date, and the reason. Audits go faster, and so does later troubleshooting.
Try Scripts on One PC
Never push a new script to everyone at once. Test it on a single machine first.
Take Repeat Repairs Seriously
A PC that keeps entering repair is telling you something. Maybe the drive is failing. Maybe a bad update is to blame. Turning the feature off only hides the symptom.
Final Thoughts
Automatic Repair helps most users most of the time. Techs still need a way to steer it, and bcdedit gives you that in seconds.
Scale is the real problem. Typing commands on one PC after another eats the whole day. MSPDepot solves that. It brings remote monitoring, patch management, backup, ticketing, and security posture into one dashboard. It was built for MSPs and IT teams who are tired of juggling six different tools.
With MSPDepot, you watch every endpoint from one screen. You catch boot trouble early. You keep each device patched and backed up. One platform. Every endpoint. Zero headaches.
Frequently Asked Questions (FAQs)
What does Automatic Repair do in Windows 11?
It tries to fix startup errors without your help. It checks boot files, the BCD, and the disk. If it fails, it opens the Advanced options menu.
Is it safe to turn off Automatic Repair?
For a short time, yes. It's handy for testing. Leaving it off long term is risky, because Windows won't attempt a fix when a real boot fault shows up.
How can I check whether Automatic Repair is on?
Open PowerShell as admin and run bcdedit /enum "{default}". Find the recoveryenabled line. Yes means on. No means off.
Why is my PC stuck in an Automatic Repair loop?
A damaged BCD, broken system files, or a failed update are the usual causes. Bad drivers and disk errors can also trigger it. Try the bootrec and sfc commands from WinRE.
Can I change Automatic Repair in the registry?
No. Windows stores this value in the BCD, not the registry. Use bcdedit.
Can I turn it on if Windows won't start?
Yes. Interrupt startup three times to open WinRE. Launch Command Prompt from Advanced options. Then run bcdedit /set {default} recoveryenabled Yes.